

 LinkedIn
Pick Leads. That is the easy part. Leave a raw form submission as your Primary conversion, and AI Max can find cheap fills on broader matches while your pipeline goes nowhere.
I have watched service-account targeting drift from family lawyer Sydney toward free legal advice: the forms arrive, but the buyers do not. An agency teardown of service-business drift describes the same trap. AI Max learns from the conversion you give it, not the customer you meant.
At the end of this walkthrough, you will have one Search campaign with AI Max on, brand and URL guardrails in place, and bidding pointed at a qualified lead rather than a raw submit. Before starting, open Google Ads with edit access, your form builder and CRM, and a one-page definition of a qualified lead. If you cannot say which leads count, do not launch yet.
Step 1: Choose Leads, but hold the launch
Do this: In Google Ads, go to + Create > Campaign > Leads > Search, select your converting website actions, then click Continue. Note which goals the setup preselects. You will correct the conversion actions before the campaign runs. If you are working with an existing Search campaign, open Campaign > Settings > AI Max to check its current state, but wait until Step 5 to enable it for this test.
New Search campaigns may already have AI Max on by default; existing campaigns need the toggle. In the AI Max panel, search-term matching and asset optimisation are separate controls. search-term matching and Final URL expansion require conversion-based Smart Bidding, according to Google’s AI Max setup instructions. There is no conversion minimum to enable AI Max, but matching will not run on Manual CPC or Max Clicks; use Maximize Conversions, Maximize Conversion Value, tCPA, or tROAS (AI Max requirements).
Expected result: the campaign objective is Leads, and you know whether AI Max is already on. The campaign is not yet your finished setup.
The mistake: treating the objective as the bidding instruction. Leads identifies the campaign’s purpose. Your Primary conversion tells Smart Bidding what a lead is. Those are not the same decision.
Step 2: Make the qualified lead the Primary action
Do this: Go to Goals > Conversions > Summary and open the raw Form submit action. Find Edit settings > Goal and action optimisation > Secondary (observe only) > Save. Open your Qualified lead, SQL, or Closed-won import action and set the qualified action to Primary (default). If this campaign needs its own goal selection, use Campaign goals > Use campaign-specific conversion goals and include that qualified goal.
Do not make the swap on a running campaign before the qualified action can record. Set up the import in Step 4, confirm it appears, then demote the raw submit and make the qualified action Primary before you turn on AI Max. For a new campaign held before launch, you can make those changes as you build it.
This is the switch that matters. Primary actions appear in Conversions and feed Smart Bidding; Secondary actions remain available in All conversions for observation (Primary and Secondary conversion actions). If raw submits stay Primary, cheap fills remain the easiest way for the campaign to satisfy its target. If a qualified lead is Primary, bidding has to work toward that signal instead.
Expected result: the campaign Goals tab shows one qualified Primary action and raw submits as Secondary. Keep the later CRM stages available for inspection rather than making every stage a competing Primary target.
The mistake: leaving both raw submits and qualified leads Primary because more conversion volume looks comforting. I used to tell clients volume helped learning. I was wrong when that volume was junk. A form fill that never qualifies teaches the campaign to find another form fill that never qualifies.
Step 3: Pass lead details for enhanced conversions
Do this: Go to Goals > Conversions > Settings, accept the customer data terms, and enable Enhanced conversions for leads. In GTM, create a User-Provided Data variable mapping email, phone, first_name, and last_name from the form data layer. Open the Google Ads conversion tag and check Include user-provided data from your website. Keep the tag firing with the form submit.
That user-provided data is SHA-256 hashed in the browser before matching. The point is attribution: if the form data can help match a lead back to the ad interaction when cookies fail, more of the leads you actually received can appear in your reporting. It does not turn a junk lead into a qualified one. Step 4 supplies the qualification signal.
Go back to Goals > Conversions > Summary. Check for Recording Conversions (Enhanced), open the action’s Diagnostics tab, and inspect Enhanced Conversions Match Rate. The setup and diagnostics walkthrough gives Excellent or 70% plus as a target, with 60–80% a healthy range depending on personal versus corporate email use.
Expected result: enhanced conversions are recording, and Diagnostics shows whether the submitted details are matching. Check the actual mapping if the rate is weak.
The mistake: enabling the toggle, seeing no immediate warning, and calling it done. I have seen accounts sit at 25% match for months because the GTM variable never picked up phone. Open Diagnostics before you trust the wiring. The setting alone is not the signal.
Step 4: Import qualification from the CRM
Do this: Add hidden gclid, gbraid, and wbraid fields to each lead form and store those values on the contact record in HubSpot, Salesforce, or Zoho. When a lead reaches MQL, SQL, Opportunity, or Closed-Won, upload the stage as its own conversion action with its timestamp and value. Send updates daily or twice weekly rather than waiting for a monthly sales report.
For a form on the landing page, this is the capture pattern. Connect the hidden fields to the CRM record as part of your form setup:
<input type="hidden" name="gclid" id="gclid_field" />
<input type="hidden" name="gbraid" id="gbraid_field" />
<input type="hidden" name="wbraid" id="wbraid_field" />
<script>
const u = new URLSearchParams(window.location.search);
for (const id of ['gclid', 'gbraid', 'wbraid']) {
  document.getElementById(`${id}_field`).value = u.get(id) || '';
}
</script>
The snippet reads the URL of the page that contains the form. If the visitor moves to a different page before submitting, check that your form flow still carries the click identifier through; do not assume the snippet can recover a value that is no longer in the URL.
Google accepts uploads up to 90 days after the click. If GCLID capture breaks, enhanced conversions for leads can still match using hashed email without it (offline import workflow and fallback). That is a fallback, not a reason to skip the fields. Once qualified imports are arriving, complete the Primary/Secondary swap from Step 2.
Expected result: qualified conversions appear under Goals > Conversions > Uploads within 24 hours of upload. Your CRM record also retains the stage that explains why a lead counted.
The mistake: importing only Closed-Won once a month. That leaves bidding with sparse, late feedback. Upload the ladder so you can see volume early and value later, while keeping the qualified action as the Primary bidding signal for this campaign.

Step 5: Enable AI Max and constrain where it can go
Do this: Open Campaign > Settings > AI Max and switch it On. Review search-term matching and Asset optimisation separately. Set Brand inclusions/exclusions at campaign level. Add campaign-level URL exclusions for destinations such as /blog/, /careers/, and /support/; use ad-group URL inclusions for the pages you want that ad group to use. Open Asset optimisation and review Text customisation and Final URL expansion line by line.
These are not decorative settings. AI Max can build matches and copy from landing pages, so a stale or irrelevant page gives it poor material. Brand and URL controls need the AI Max toggle on to apply, and ad-group brand inclusions override the campaign setting (Google’s guardrail setup). Current pages matter when you allow expansion; AI Max setup guidance notes the uplift seen in exact- and phrase-heavy campaigns with current landing pages.
Expected result: AI Max: On appears in Settings, your brand and URL controls are saved, and the landing-page report is not sending money to excluded destinations.
The mistake: enabling it across the account because the toggle is available. Start with one mid-volume campaign at around 10% of Search spend. Check that it is not limited by budget and that account and campaign negatives remain in place. Agency testing guidance says exact match is still prioritised over AI Max expansion and puts a stable read at 8–12 weeks; it also reports Google’s roughly 14% conversion-rate lift once settled. That is a reason to run a controlled test, not to assume your qualified pipeline will rise by 14%.
Step 6: Start with an open qualified-lead bid strategy
Do this: Set the campaign to Maximize Conversions without a tCPA cap, using the qualified Primary action from Step 2. Leave that target alone for the first 14 days. A new qualified signal has thinner volume than raw submits. A tight target on day one can restrict the campaign before you know what a qualified lead costs.
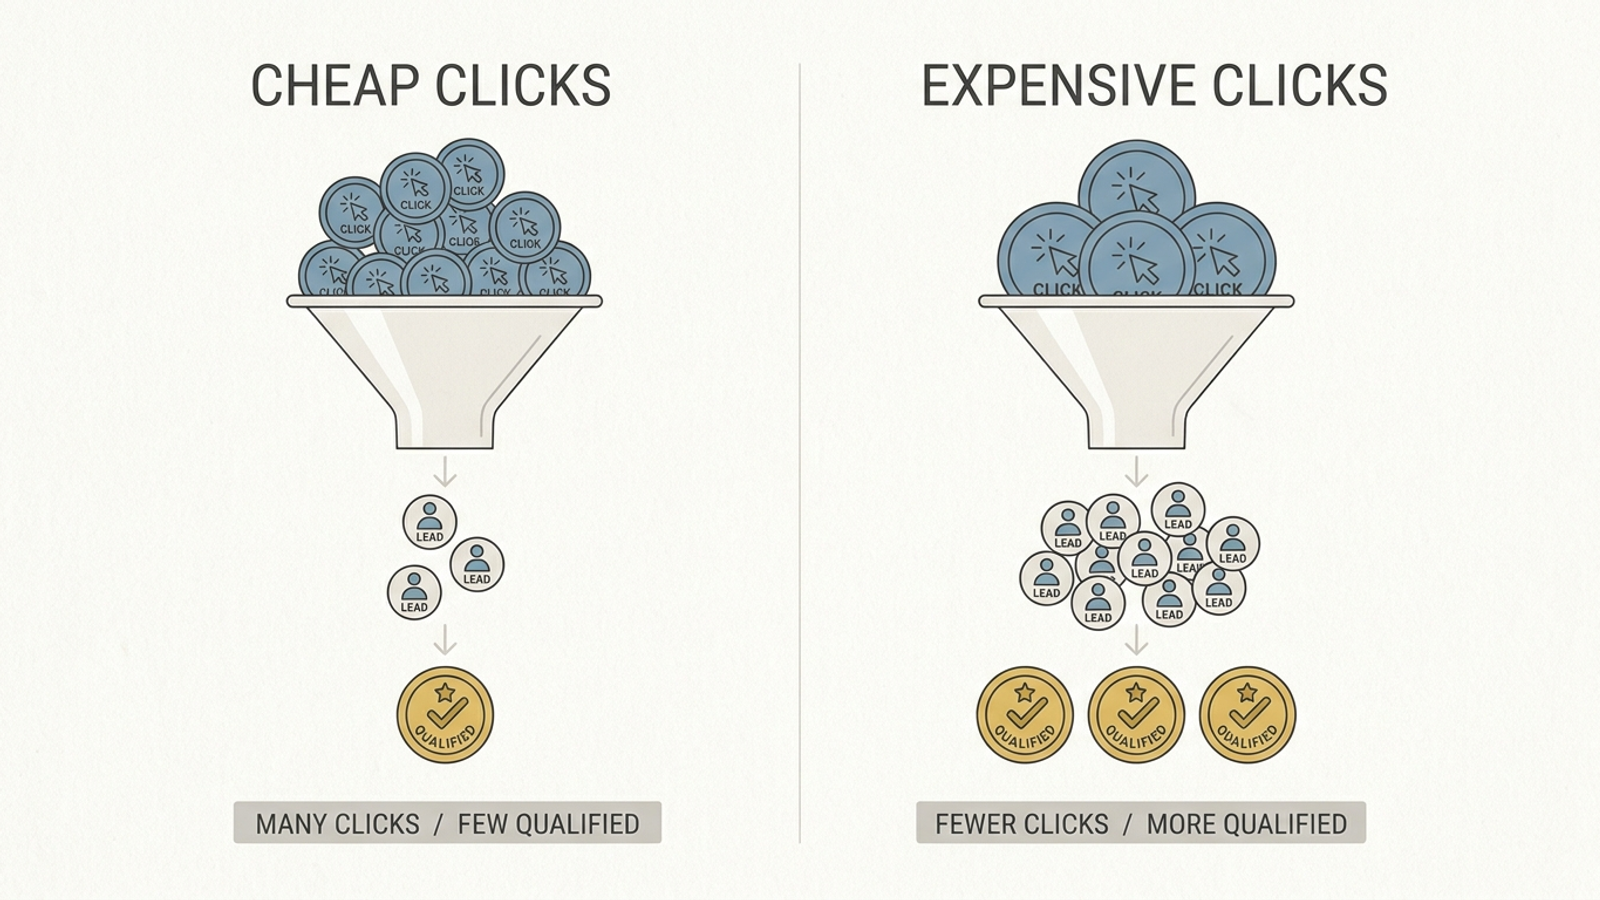
Watch the whole path: Click > Lead > Qualified > Meeting > Opportunity. CPC by itself is a poor referee. Here is the cheap-click CPL arithmetic that catches people out:
- At
$12CPC, 1,000 clicks cost$12,000. An 8% click-to-lead rate gives 80 leads at$150CPL. If 50% qualify, that is 40 qualified leads at$300each. - At
$8CPC, 1,500 clicks still cost$12,000. A 4% click-to-lead rate gives 60 leads at$200CPL. If only 20% qualify, that is 12 qualified leads at$1,000each.
The second campaign bought cheaper clicks and a much more expensive outcome. Judge cost per qualified lead, not the price of entry. Once you have 15–30 qualified conversions, use your qualified-lead math to set tCPA, following a Smart Bidding target-setting method.
Expected result: the campaign spends against the qualified Primary action while you gather enough qualified conversions to set a target grounded in that outcome.
The mistake: copying the old raw-lead tCPA into the new setup. Say you spend $20k/month: if one in five raw leads qualifies, a $50 raw-lead target corresponds to $250 per qualified lead. Use the second number when you set a qualified target. The first one belongs to a different conversion.
Step 7: Review intent on days 3, 7, and 14
Do this on day 3: Go to Insights and reports > Search terms, add the Match source column, filter to AI Max, and sort by cost. Add negatives for commercially wrong intent: jobs, free, salary, academic, DIY, or consumer queries in a B2B campaign. Do not negate every term with zero conversions after a handful of clicks. Then open Campaigns > Landing pages. If Final URL expansion sends spend to /blog/, /careers/, or /support/, add those destinations to URL exclusions in AI Max settings.
The warning pattern is easy to miss when you look only at clicks: CPC falls, raw fills rise, and the terms look adjacent to what you sell but cheaper. The lead-gen cost breakdown explains why CPL can climb as click-to-lead and qualified rates fall. Cheaper traffic is not a saving if it never reaches the next stage.
Do this on days 7 and 14: Join spend to CRM records, not just Google Ads form totals. Pull leads by gclid, mark Qualified, Meeting, and Opportunity, and compare cost per qualified lead by match source. Cut themes that produce fills but zero qualified leads after 100–150 clicks. Keep themes that produce qualified leads even when their CPC is higher. Allow about two weeks for learning before routine edits; keep account and campaign negatives in place throughout. Practitioner guidance on first-week controls reports that negatives are respected and exact match remains prioritised over expansion.
Expected result: you can name which AI Max traffic produces qualified leads, where that traffic lands, and what each qualified lead costs. The CRM and Ads views tell a coherent story.
The mistake: reacting to a cheaper CPC by raising spend before checking qualification. If cost per qualified lead rises while raw CPL looks flat, inspect the Primary signal and the incoming terms before touching the bid.
Verify the wiring, then change the target
Check the setup in this order:
Campaign > SettingsshowsAI Max: On, with the brand and URL guardrails saved.Goalsshows one qualified Primary action and raw submits as Secondary.- Diagnostics shows
Recording Conversions (Enhanced)and the match rate you checked, not merely an enabled toggle. Goals > Conversions > Uploadsshows recent MQL, SQL, and Opportunity updates within 24 hours of upload.- Search terms filtered to
AI Maxshow commercial intent, and the landing-page report shows spend going to offer pages. - Your CRM comparison shows what happened to cost per qualified lead, not just form-fill volume.
If those checks hold for two weeks and cost per qualified lead is flat or falling, the wiring has held. If raw fills rise while qualified leads fall, do not change bids first. Fix the Primary action, the match-rate problem, or the URL exclusions. I run this check with clients on a screen share because it takes ten minutes and ends the argument about whether a prettier form-fill chart counts as growth.
The first change once it works: move from open Maximize Conversions to a tCPA based on qualified-lead cost. Then take the same qualified-lead feedback wiring to PMax using the form-fills-only playbook. AI Max works when you feed it pipeline. Feed it forms, and it will find forms.